Thursday, December 31, 2015

Year in Review - A Few of My Favorite Projects


Hi all! So sorry I haven't been around much. Between the holidays, visitors, and CHA projects, I haven't had a lot of spare time to blog. I will have some really fun things to share in the weeks ahead - I can't wait!

In the meantime, I thought it would be fun to look back at a few of my favorites from each month last year. They ended up a bit out of order in the collage, but here they are, month by month:

January - Pop it Ups Steampunk Birthday
February - Grungy ATB
March - Leave a Little Sparkle Card
April - Faux Galvanized Canisters
May - Steampunk Tunnel Card
June - Romantic Die Cut Box
July - French Country Pop Up Card
August - Chalk Paint Mini Mason Jar
September - Autumn Leaves Lantern
October - Rare Oddities Apothecary Cabinet
November - Christmas Tag Pop Up
December - Vintage Sleigh Ornament

I hope you enjoyed this short recap - it was so hard to choose just one from each month! Looking back is always so much fun.

I want to also take a moment to thank the fantastic designers and companies who I've been privileged to work with over this past year:

Karen Burniston, whose Pop it Ups cards never fail to amaze and thrill me, and who I am lucky to call a 'real life' friend.
Eileen Hull, whose ScoreBoards dies inspire me and allow me to let my creative imagination run wild. Eileen is also one of the kindest, most supportive and generous people in the business!
Ranger Industries, who invited me to share a couple of projects on their blog. I can't say how much that meant to me!
DecoArt, who sent the most fabulous box of their Media line of products and who share freely on social media. Such an incredibly generous company!
And even though I wasn't able to stay very long, I had a wonderful time on the Frilly and Funkie DT this year. You truly won't find a more talented group of designers in this business!

Finally, thanks to all of you. Your supportive comments here, and positive feedback on Facebook and Instagram are why I do this. Well, that and the fact that it keeps me from going totally insane...but mostly because of you! I love sharing my work with you all. I hope you continue to follow along in 2016!

Best wishes for a creative, happy, and healthy New Year to you all! xoxo

Tuesday, December 15, 2015

Pop it Ups Designer Challenge - Home for the Holidays

Hi all! Today I'm sharing my card for this month's Karen Burniston Designer Challenge. For December, the theme is Home for the Holidays. We could use any of the dies to depict our idea of what that meant to us. I knew right away that I wanted to make a little cabin in the woods, surrounded by snow and trees. That's my idea of the perfect holiday house!

I've been wanting to try making stamps from the trees from Karen's Evergreen Pivot Card die set and this was the perfect time to try it. I cut them from thin fun foam that I bought in a pack at the dollar store. To give the stamp some texture, I pressed a piece of foliage onto the surface after I'd inked it. I love the subtle look of it.

After I'd stamped the trees on the top half of the card, I used Karen's Lots of Pops die to cut the pop-up. I stamped several more trees and then used the die to cut them out (that is, I finally figured out I could use the die after cutting several of them out by hand and thinking, 'boy, I wish I had a die that could cut these.' Duh!).

The cabin was made by cutting the Holiday House from adhesive-backed kraft cardstock, and then cutting it into strips and applying it to a base cabin piece. ECD's white microfine glitter makes perfect snow. I wanted some tiny antlers for above the door, but knew I didn't have anything that small. Remembering Karen's use of shrink plastic, I had an ah-ha moment and made some using the detail layer from Rudy the Reindeer's antlers. So cute! The snow was made by cutting adhesive-backed cardstock using the wavy die from the Outside Edges set. I removed the adhesive, added Warm Diamond glitter, and cut the pieces to size. It's so pretty!

Here's a quick little video showing the front and how the card looks as it's opening. I hope you can see all the sparkle from the glitter! It's fabulous.

The supplies I used can be found at Elizabeth Craft Designs and Simon Says Stamp via the links below.


Be sure and check out the Elizabeth Craft Designs blog tomorrow for an amazing card from Karen and loads of inspiration from the rest of the team.

Have a great week!


Wednesday, December 9, 2015

Frilly and Funkie - 'Tis the Season!

Hi all! Today I'm sharing my project for the latest Frilly and Funkie challenge. The very talented Nancy is our hostess this time and here's what she has to say about our theme, "With Christmas quickly approaching I've chosen the theme of: 'Tis the Season!' I'm keeping it super simple. You may create any type of vintage or shabby chic holiday themed project - whatever winter holiday you celebrate!"

I was inspired by all of the tartan/plaid I've been seeing lately - especially a pillow my good friend Michelle made me. I really wanted to make something useful and festive, so I decided to make some napkins for my holiday table. We use cloth napkins daily and, for some reason, I have never thought to make them myself! The best thing is that this project is totally no-sew, so you don't have to haul out your machine. A huge plus in my book!

To make the napkin, I cut my fabric (found at Hobby Lobby) to about 18" square and then washed it. I wanted a frayed edge. If you don't want it to fray more, you can use a liquid product like Dritz Fray Check on the edges. Next, I adhered a scrap of a cashmere sweater I found at a thrift shop to a piece of Thermoweb Heat'n Bond. Once that was cool, I die cut it using Tim Holtz's Prancing Reindeer die. To adhere it to the napkin, I simply peeled off the backing and ironed the reindeer onto the napkin. Easy!

The napkin ring was created by first cutting a piece of paper towel tube to 1.5". I cut a piece of burlap surfaces to the same width and adhered it to the paper tube. I tied it with Tim's paper string and a sweet tree charm and I was done. This project is so quick and easy, you could pretty much make a set while your Christmas turkey was in the oven!

The supplies I used can be found at The Funkie Junkie Boutique via the links below.


Thanks so much for stopping by today. I'm sad to say this is my last project for the Frilly and Funkie team. I've had a blast during my six short months with this fabulously talented team and I hate to leave, but my schedule is just not giving me the time I need to keep up with the amazing work of my fellow designers. A huge thanks to the wonderful Linda Coughlin who is as talented as she is kind, and the incredible Jenny Marples (Buttons) who put up with my endless questions and who runs the team so beautifully. And one more shout out to the rest of the team - you are all an endless source of inspiration and I'm so thankful that I could hang out with you for awhile!

Wednesday, December 2, 2015

Pop it Ups Vintage Sleigh Ornament

Hi all! Today I'm sharing a tutorial for this sweet little sleigh ornament created with Karen Burniston's Sleigh Gift Card Holder Pop Up die. The die is meant to create a pop-up card with the sleigh inside holding a gift card, but I just knew it would also make the cutest ornament! Here's how I did it:

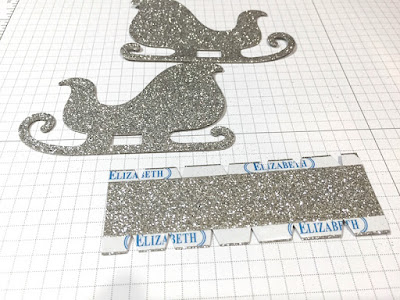
Die cut two sleighs from silver glitter paper using the large base sleigh. Adhere a sheet of Elizabeth Craft Designs adhesive to the back of another piece of glitter paper. Cut two more sleighs, but make the cuts from the back side, creating a mirror image.

Remove the release paper and adhere the glitter sleighs, creating two sleighs with glitter on each side. Next, cut a piece of glitter paper measuring 4.5" x 1.5". Score 1/4" from the edge on either side and adhere a strip of Elizabeth Craft Designs adhesive tape. Cut tabs as shown.

Fold up tabs, remove release paper, and adhere one side of strip to one sleigh. Repeat with the other piece. You now have a 3D sleigh!

Now we can decorate! Cut two of the decorative layers of the sleigh from Velvet Adhesive Paper, again reversing the paper on the second cut to create a mirror image. Emboss the die cuts using Karen Burniston's Damask Embossing Folder. Note - it's better to emboss after you cut. The texture gets flattened a bit if you emboss first.

To finish your ornament, adhere the embossed velvet paper to either side of the sleigh. Die cut the Noel and snowflakes from adhesive-backed paper and adhere as shown. Die cut several Berry Branches and glue inside the sleigh. Add a tree, die cut gifts, a ribbon, and your ornament is complete!

So, is that not the sweetest thing ever?! I do an ornament swap with a few close friends every year and this one just went to the top of the list of ideas - now I just need to make three more!

The dies, paper, and adhesive I used can be found at Elizabeth Craft Designs via the links below. Everything else can be found at Simon Says Stamp.


Thanks so much for stopping by today - have a great week!

Tuesday, December 1, 2015

Art with Heart Challenge - Favorite Things

Hi everyone! Today I'm sharing a project for the latest Eileen Hull Art with Heart Challenge. This month, our theme is Favorite Things. I was so happy for this theme because this is one of my all-time favorite things! It's a gratitude journal box that I created with Eileen's Train Case die - oh how I love this die!

The panels were cut from Eileen's Matboard, assembled, and then covered with paper by Teresa Collins. On top of the case I added some Prima flowers and a tag cut with Tim Holtz's Tiny Tabs and Tags die.

The concept of the gratitude journaling cards was that, each day/week/month, you would jot down things that you were grateful for. You could even add photos, clippings, etc. Just little snippets of life that you want to capture and remember. At the end of the year, you'd have a keepsake box that you could look back through and reflect on your memories.

The journaling cards were cut from cream cardstock to fit the box. The divider cards were cut from the same pad of Teresa Collins paper. I computer-generated the months and used the same Tiny Tabs die to cut the little window tabs. After decorating the inside of the box, just add the cards and you're set!

The dies and matboard I used can be found at Sizzix via the links below. Everything else can be found at Simon Says Stamp. Unfortunately, I can't find a source for the paper, but check your local Michaels store - they might still have some in stock.


Thanks so much for stopping by today - I hope you're inspired to make your own gratitude journal box. Eileen's Train Case die is so versatile, there are so many great ways to use it. Make sure you check out all the fantastic Favorite Things projects from the rest of the team, and read all about how you can join in the challenge fun HERE. I hope you can play along!